
Craving more recipe inspo? Follow me on Pinterest for fresh ideas daily
No-Bake Heavenly Oreo Dessert
It was one of those weekends where everything felt a bit messy but in a good way. We had a small family trip planned, nothing fancy, just food, kids running around, and way too many snacks in the car. You know those moments when you think you’re organized… and then reality shows up? Yeah, that kind of vibe
We were staying at my aunt’s place near the coast, and honestly, I thought I would relax, but nope, I ended up in the kitchen again because someone said, “We need dessert,” and suddenly everyone was looking at me like I’m the official chef of the family
Have you ever had that happen? Like you didn’t plan to cook, but somehow you’re in the kitchen with chocolate on your hands and zero escape plan
I remembered this No-Bake Heavenly Oreo Dessert I tried once, and let me tell you, the first time was not perfect at all. I messed up the cream layer, it got a bit too soft, and I panicked a little, not gonna lie, I thought I ruined it, but then I just threw it in the fridge and hoped for the best
Funny thing is, it still came out amazing later, like actually really good, and everyone acted as I planned it that way, typical right
It’s funny, isn’t it, how simple desserts can save the day when everything else feels a bit chaotic. Kids are loud, people are hungry, and you want something easy that works without stress
Table of Contents
🍪 No-Bake Heavenly Oreo Dessert
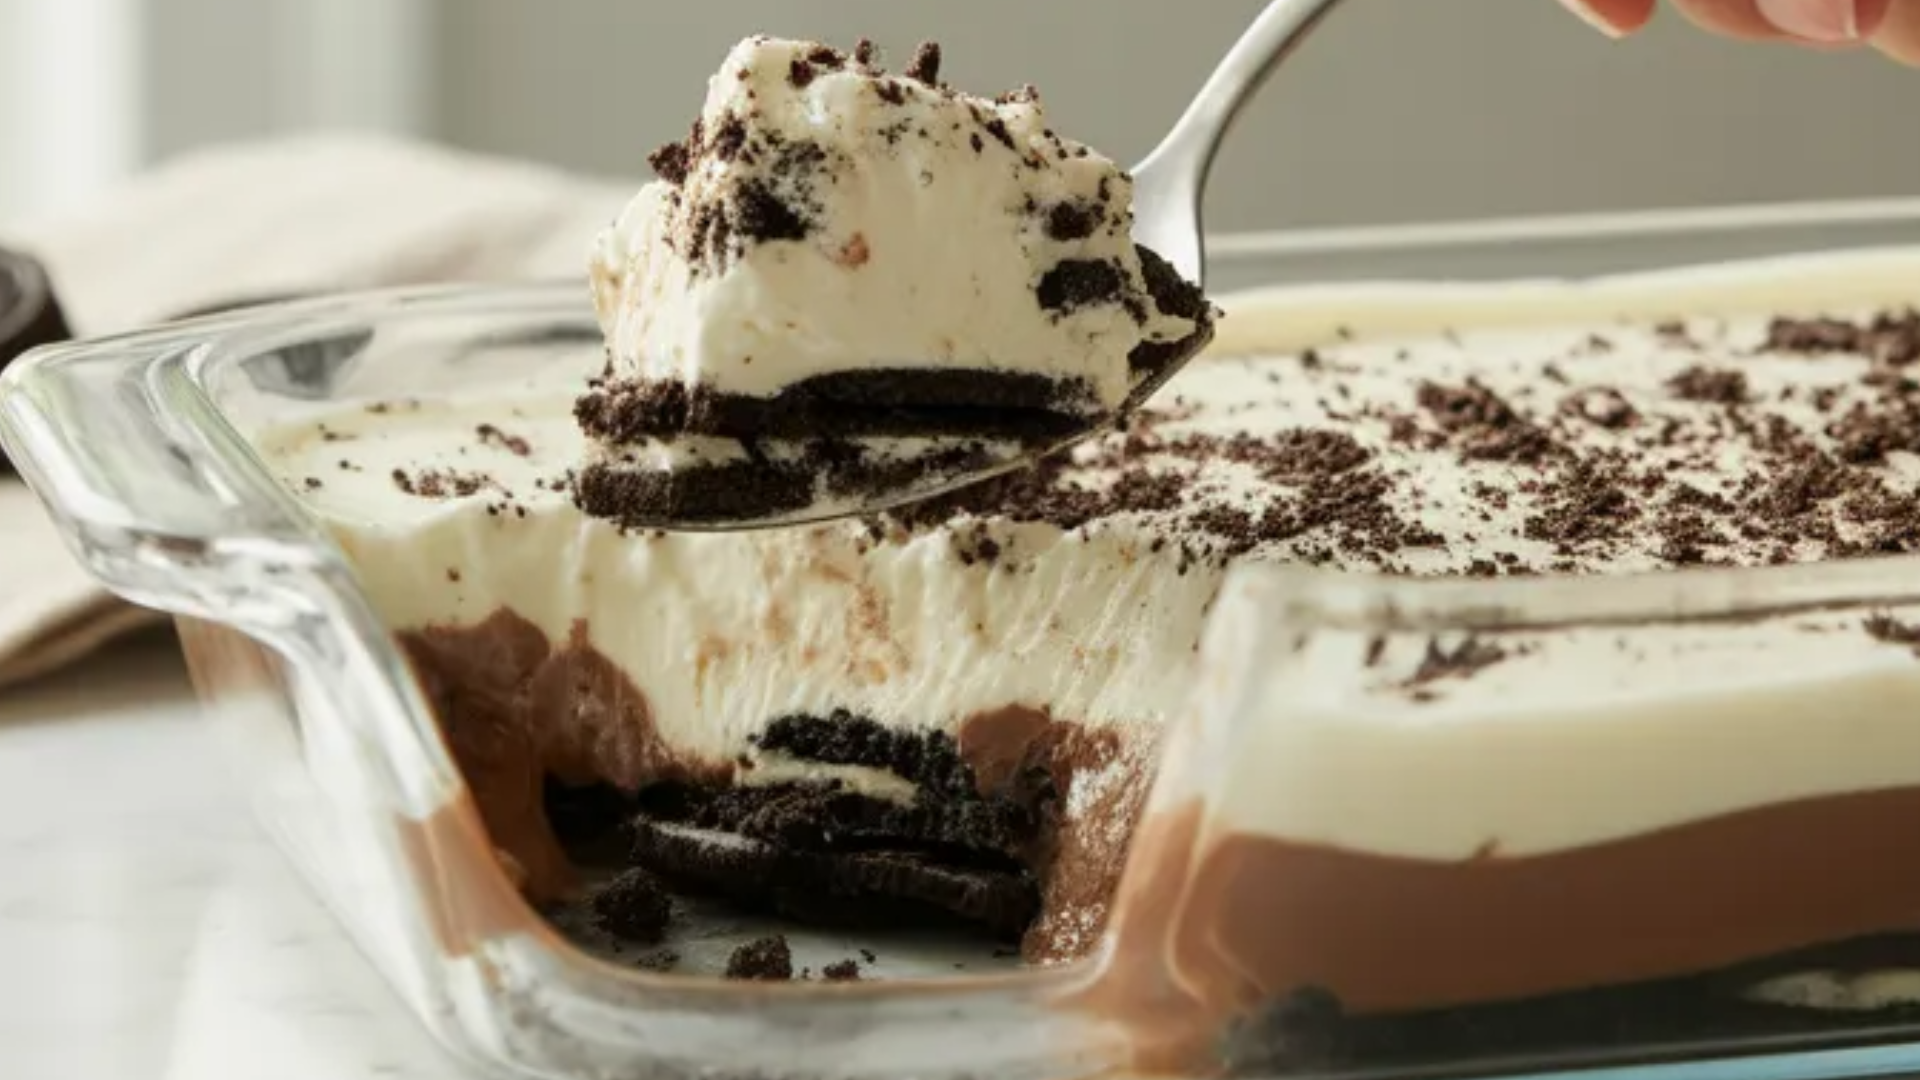
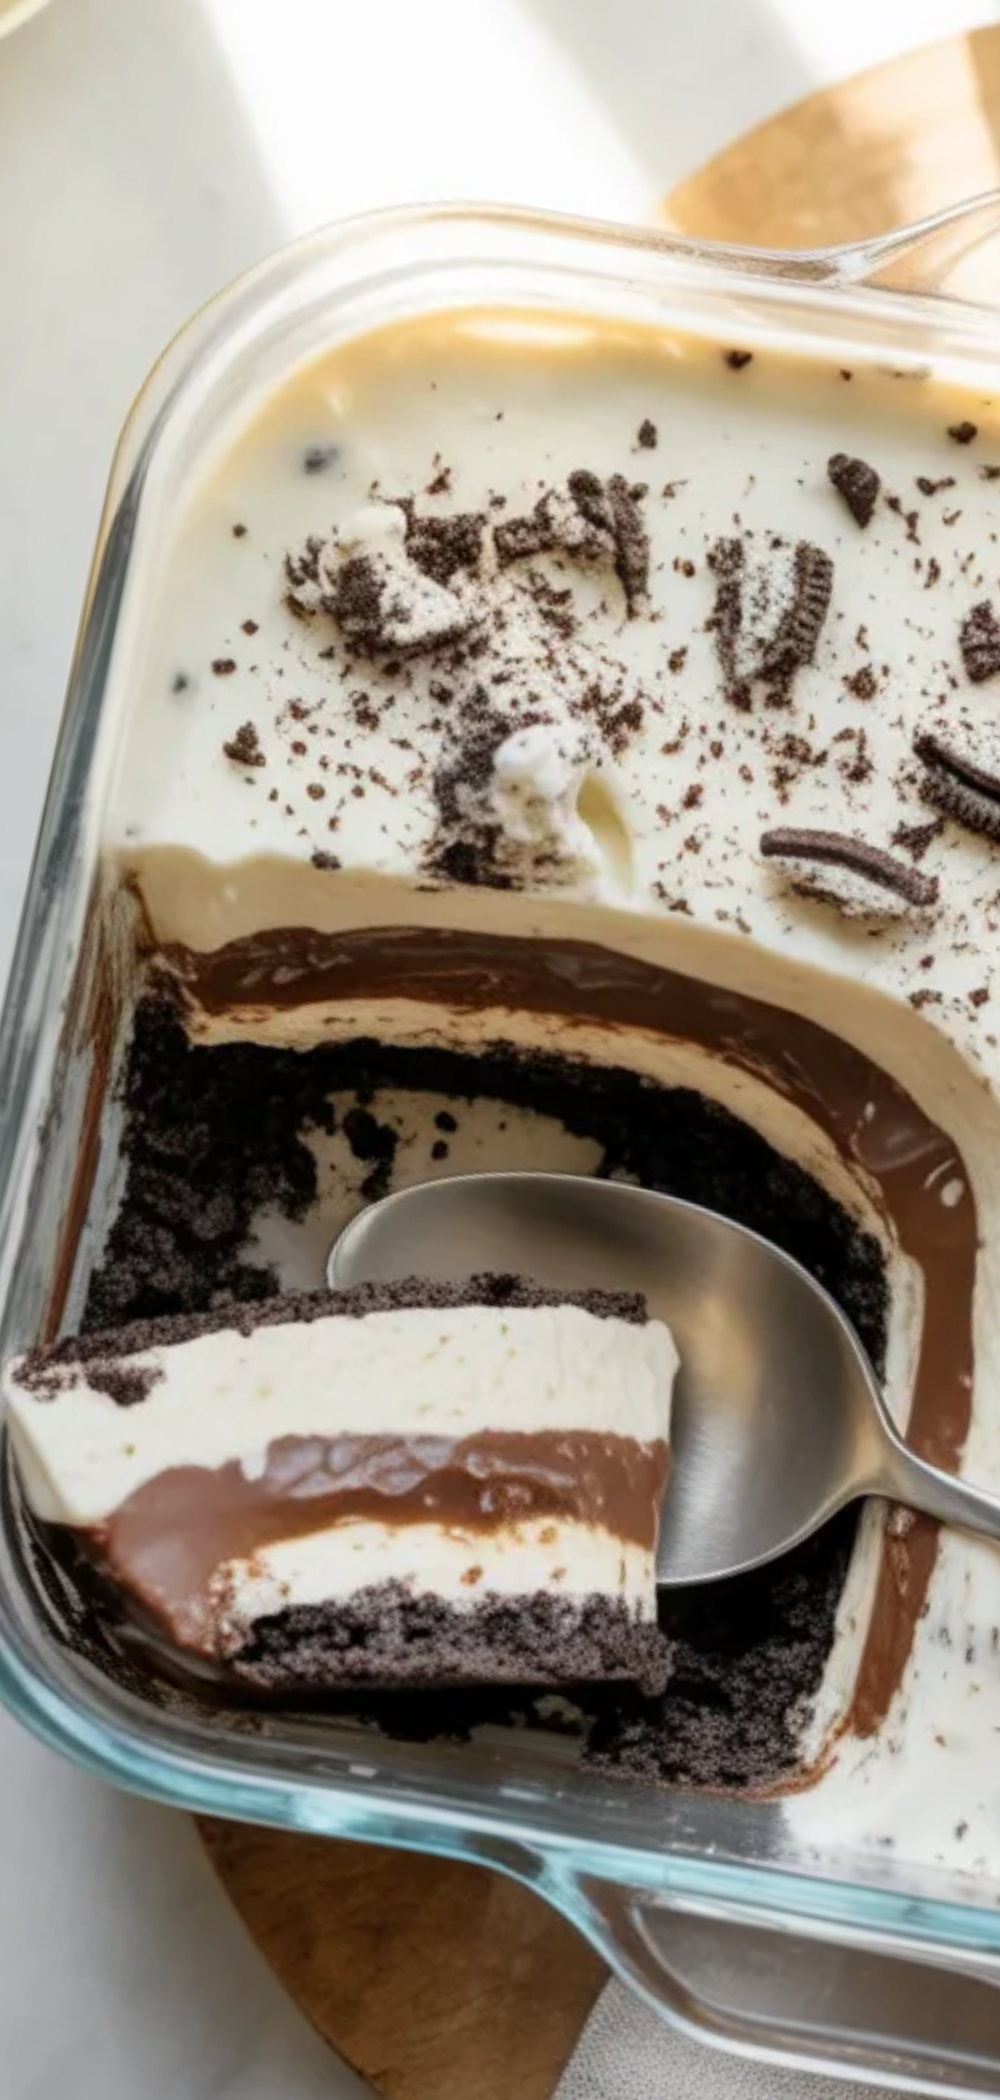
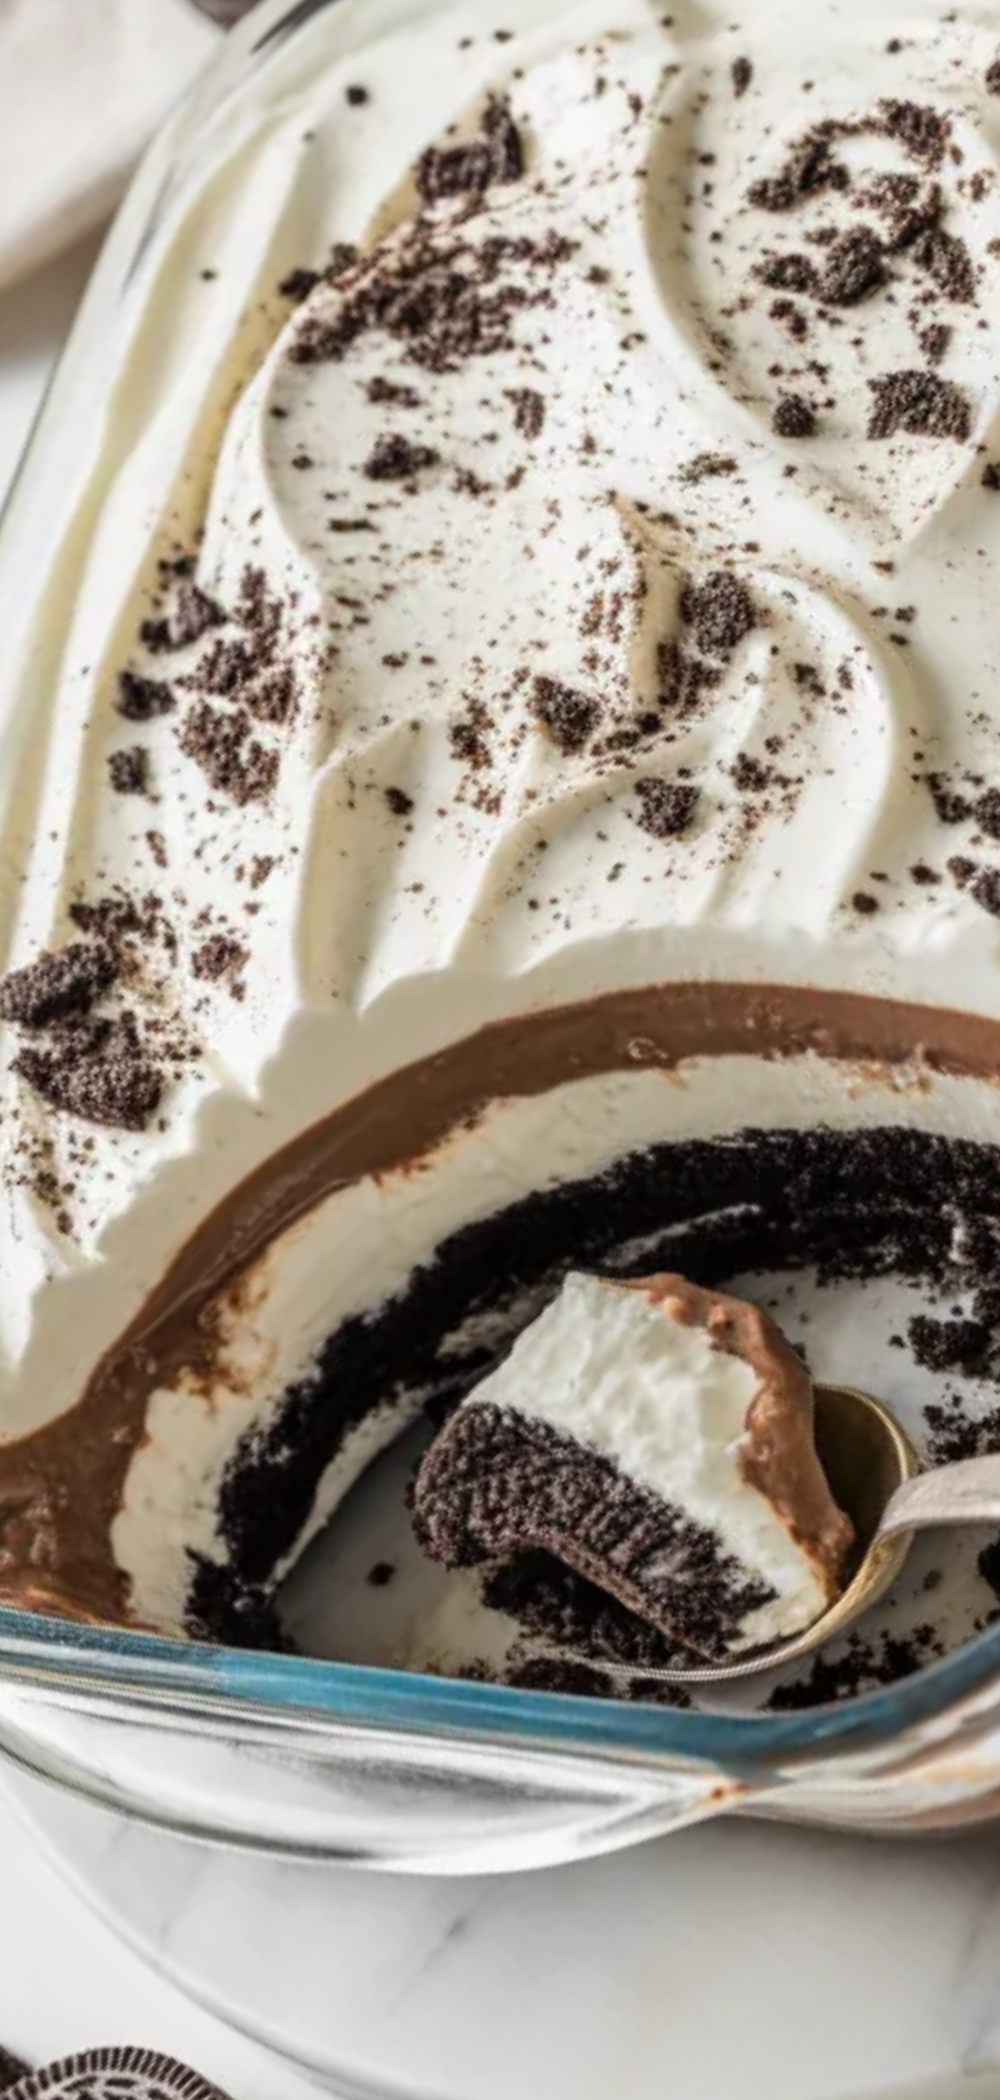
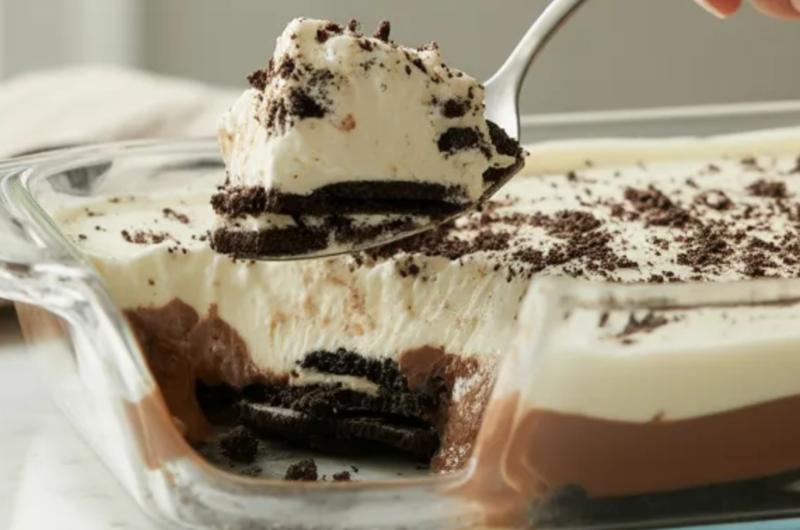
No-Bake Heavenly Oreo Dessert is a creamy, rich, and super easy dessert made with layers of crushed Oreo cookies, sweet cream cheese filling, chocolate pudding, and fluffy whipped topping. It tastes like cookies and cream heaven in every bite, and the best part is you don’t need an oven at all. Just mix, layer, chill, and enjoy!
This dessert is perfect for family gatherings, birthdays, potlucks, or even a simple weekend treat. Kids love it because it is sweet and soft, and adults love it because it feels like a nostalgic chocolate cookie dream.
☕🍫 What to Eat With No-Bake Heavenly Oreo Dessert
This dessert is already rich and filling, so it goes best with simple drinks and light snacks. You can serve it with:
- 🥛 Cold milk for a classic cookies-and-cream combo
- ☕ Hot coffee or cappuccino to balance the sweetness
- 🍓 Fresh strawberries or berries for a fruity contrast
- 🍦 Vanilla ice cream for extra creaminess
- 🍪 Simple butter cookies if serving at a dessert table
It also pairs perfectly after a light meal like pasta, grilled chicken, or sandwiches.
🧾🍪 INGREDIENTS: for No-Bake Heavenly Oreo
Here’s everything you need to make this delicious no-bake dessert:
- 🍫 1 family pack Oreo cookies (about 36 cookies)
- 🧈 ½ cup melted butter
- 🧀 2 (8 oz) packs cream cheese (softened)
- 🍬 1 cup powdered sugar
- 🍦 1 tsp vanilla extract
- 🥄 1 (8 oz) tub whipped topping (Cool Whip style)
- 🍫 1 (3.9 oz) instant chocolate pudding mix
- 🥛 2 cups cold milk
- 🍪 Extra crushed Oreos for topping
👩🍳🍰How to make No-Bake Heavenly Oreo?
🥣 Step 1: Make the Oreo crust
Crush all Oreo cookies into fine crumbs. You can use a blender or a plastic bag + rolling pin.
Mix the crumbs with melted butter until it looks like wet sand.
🧁 Step 2: Press the crust
Take a baking dish (9×13 inch) and press the Oreo mixture firmly into the bottom.
Make it smooth and even, then place it in the fridge.
🧀 Step 3: Make cream cheese layer
In a bowl, beat the cream cheese until smooth and fluffy.
Add powdered sugar and vanilla extract and mix well.
☁️ Step 4: Add whipped topping
Gently fold in half of the whipped topping.
This makes the layer soft, creamy, and airy.
🍫 Step 5: Spread cream layer
Take the crust out of the fridge and spread the cream cheese mixture evenly on top.
🍮 Step 6: Make chocolate pudding
In another bowl, whisk instant pudding mix with cold milk for about 2 minutes until it thickens.
🍫 Step 7: Add pudding layer
Spread the chocolate pudding gently over the cream layer.
☁️ Step 8: Final topping
Add the rest of the whipped topping on top like a soft, fluffy blanket.
🍪 Step 9: Decorate
Sprinkle crushed Oreos on top for crunch and decoration.
❄️ Step 10: Chill
Cover and refrigerate for at least 4 hours (overnight is best).
This helps all layers set perfectly.
🍽️🔪 KITCHEN EQUIPMENT
- 🥣 Mixing bowls
- 🧑🍳 Electric mixer or whisk
- 🍽️ 9×13 baking dish
- 🥄 Spoon & spatula
- 🔪 Rolling pin or blender (for crushing Oreos)
- 📏 Measuring cups
❄️📦 HOW TO STORE LEFTOVERS?
- Keep covered in the fridge 🧊
- Lasts 4–5 days
- Best eaten cold
- You can also freeze slices for up to 1 month ❄️
- Thaw in the fridge before serving
💡📝 NOTES & TIPS
- Use full-fat cream cheese for the best texture
- Chill longer for cleaner slices
- Don’t overmix whipped topping, or it may lose fluffiness
- You can add chocolate chips or caramel drizzle for extra flavor
❓🍪 FAQ
H3 Can I use homemade whipped cream?
Yes! Just make sure it is whipped until stiff peaks.
H3 Can I make it ahead of time?
Yes, it’s actually better when made the night before.
H3 Can I skip pudding?
You can, but it makes the dessert less creamy and rich.
H3 Can I use different cookies?
Yes, but Oreos give the best cookies-and-cream flavor.
H3 Is it kid-friendly to make?
Yes! Kids can help crush cookies and mix layers.
H3 Why does it need to chill?
So the layers firm up and don’t fall apart when cutting.
H3 Can I make it in cups instead of a tray?
Yes, small dessert cups work perfectly for parties.
H3 How do I get clean slices?
Use a sharp knife and wipe it between cuts.
🍰✨ CONCLUSION.
No-Bake Heavenly Oreo Dessert is one of the easiest and most delicious desserts you can make at home. It’s creamy, crunchy, chocolatey, and perfect for sharing with family and friends. Since it requires no baking, it’s also great for beginners or kids who want to help in the kitchen.
If you enjoyed this recipe, share it with your friends and family 💕 and don’t forget to subscribe to the blog for more easy, fun, and delicious dessert ideas!
No-Bake Heavenly Oreo Dessert
Course: DessertCuisine: AmericanDifficulty: EasyServings
10–12
servingsPrep time
20
minutesCooking time
00
minutesCalories
380
kcal🍪 INGREDIENTS:
🍫 1 family pack Oreo cookies (about 36 cookies)
🧈 ½ cup melted butter
🧀 2 (8 oz) packs cream cheese (softened)
🍬 1 cup powdered sugar
🍦 1 tsp vanilla extract
🥄 1 (8 oz) tub whipped topping (Cool Whip style)
🍫 1 (3.9 oz) instant chocolate pudding mix
🥛 2 cups cold milk
🍪 Extra crushed Oreos for topping
Directions
- First, take your Oreo cookies and crush them into fine crumbs. You can use a food processor, or put them in a plastic bag and smash them with a rolling pin. Mix the crumbs with melted butter until they look like wet sand. This will be your crust.
- Press the Oreo mixture into the bottom of a 9×13-inch baking dish. Use a spoon or your fingers to make it flat and firm. Put it in the fridge while you make the next layer.
- In a large bowl, beat the cream cheese until it becomes smooth and fluffy. Add powdered sugar and vanilla extract, then mix again until everything is creamy and sweet.
- Gently fold in half of the whipped topping. This makes the cream layer light and fluffy, like a cloud.
- Spread the cream cheese mixture evenly over the Oreo crust. Try to make it smooth so every bite is perfect.
- In another bowl, whisk together the instant chocolate pudding mix and cold milk. Keep whisking for about 2 minutes until it starts to thicken.
- Pour the pudding layer over the cream cheese layer and spread it evenly.
- Add the remaining whipped topping on top like a soft white blanket.
- Sprinkle crushed Oreos on top for decoration and extra crunch.
- Cover the dish and place it in the fridge for at least 4 hours (overnight is even better). This helps all the layers set and taste even more delicious.
Notes
- Use full-fat cream cheese for the best texture
Chill longer for cleaner slices
Don’t overmix whipped topping, or it may lose fluffiness
You can add chocolate chips or caramel drizzle for extra flavor